[V2] BYO (Bring Your Own) Auth + Chat
Designed for products with their own backend and authentication, this version gives you full control over user onboarding, syncing, and logout while seamlessly integrating powerful Sageion capabilities.
Prerequisite
- Sign up / log in to your Sageion account.
- Create a New App and select Version V2 during setup.
- Open the App Details page and note your: App Name, API Key, and Region (US or IN).
Project setup
Client Side Integration
Sageion boots in two ordered phases: setUp() prepares configuration and storage, and initialize() authenticates the user and mounts the chat UI. Pick your framework below, then pick the integration style that matches your app's structure.
⚠️ Lifecycle contract — read before you split anything
- setUp() must resolve before initialize() is called. initialize() reads the setup_done flag written by setUp() and refuses to run without it.
- Both functions throw a SageionSetupError on failure. Each also renders an error popup with a Reset Settings button.
- Never place setUp() and initialize() in two independent DOMContentLoaded listeners. DOM listeners do not chain await — initialize() will fire while setUp() is still in flight, and the SDK will reject it with "initialize ran before setUp could finish."
- To split them across scripts, bridge them with a shared promise (see the Two-Block tab).
You can inspect the current phase at any time with window.sageion_os.getSetupStatus(), which returns one of: "idle" | "pending" | "done" | "failed".
1. Load The Scripts
<script src="https://cdn.socket.io/4.1.2/socket.io.min.js"></script>
<script src="https://magicchat-core.github.io/dev-sscc-client-cdns/bundle.js"></script>SDK global
Loading the bundle exposes window.sageion_os. Every example below uses that global.
2. Decide how to place the Sageion chat box in your app.
Pick your framework below. Inside each framework, choose the integration style that matches your app's structure.
Plain HTML + JavaScript. Choose one of the three integration styles below.
Single-Block Implementation
One async flow, both calls awaited in order. This is the simplest, safest setup and is what most apps should use.
Use this when your app has a single entry HTML file and the chat box should appear across all routes.
<script>
  (async () => {
    try {
      await window.sageion_os.setUp(
        "your_app_name",                 // app_name
        "YOUR_API_KEY",                  // api_key (base64)
        "US",                            // region: "US" | "IN"
        "sageion-chat-root"              // chat_root_id (optional)
      );

      // Optional: resolve uid from your own auth
      const token = localStorage.getItem("token");
      let payload = {};
      if (token) {
        const res = await fetch(`${window.__APP_CONFIG__.API_BASE_URL}/auth/profile`, {
          headers: { Authorization: `Bearer ${token}` }
        });
        if (res.ok) {
          const user = await res.json();
          payload = { uid: user.id.toString() };
        } else {
          localStorage.removeItem("token");
        }
      }

      await window.sageion_os.initialize(payload);

      console.log("Sageion ready. Status:", window.sageion_os.getSetupStatus());
    } catch (err) {
      // The SDK already rendered an error popup. Log for diagnostics only.
      console.error("[Sageion] bootstrap failed:", err);
    }
  })();
</script>Minimal form
Only the first three arguments are required. chat_root_id has a sensible default — most apps can simply write:
await window.sageion_os.setUp("your_app_name", "YOUR_API_KEY", "US");Don't split across two DOMContentLoaded listeners
Two separate document.addEventListener("DOMContentLoaded", …) blocks do not chain their awaits. initialize() will run before setUp() resolves and the SDK will reject it. If you need two blocks, use the Two-Block tab.
Parameter Details — setUp()
| Parameter | Type | Required | Description |
|---|---|---|---|
| app_name | string | Yes | Unique application identifier. |
| api_key | string | Yes | Base64-encoded API key from App Details. |
| region | string | Yes | "US" or "IN" — used as the config lookup prefix. |
| chat_root_id | string | No | Optional DOM element id to mount the chat into. Falls back to document.body. |
Parameter Details — initialize()
| Field | Type | Description |
|---|---|---|
| payload.uid | string | Required when dont_show_chat_box_at_logout is enabled for your app. |
Upgrading from a previous SDK version
Earlier versions of the SDK accepted extra arguments (header_req, version). Both have been removed. If you were passing them, drop them and keep only the arguments shown above.
| Old call | New call |
|---|---|
| setUp(name, key, region, false, "chat-root") | setUp(name, key, region, "chat-root") |
| setUp(name, key, region, false) | setUp(name, key, region) |
| setUp(name, key, region) | setUp(name, key, region) (unchanged) |
Handling login & logout at runtime
setUp() runs once per page load. It does not re-run when the user logs in or out in place. To reflect auth changes without a page reload, call initialize() again with the new uid, or call logout().
// After a successful login (no page reload):
async function onLogin(user) {
  await window.sageion_os.initialize({ uid: user.id.toString() });
}

// On logout:
function onLogout() {
  window.sageion_os.logout();  // clears SDK storage, disconnects sockets, resets state
  // To re-open the chat as anonymous immediately:
  // await window.sageion_os.initialize();
}Failure reference
Both setUp() and initialize() throw a SageionSetupError on failure. The four most common messages are:
| Error | Cause | Fix |
|---|---|---|
| Wrong `api_key` found in credentials | api_key in your config does not match the cached auth_key | Correct the key, then click Reset Settings in the error popup (or call sageion_os.logout()) |
| The current domain (X) is not authorized | Your hostname is not in the app's whitelabel_domains | Ask your Sageion admin to add the domain |
| initialize ran before setUp could finish | initialize() was called before setUp() resolved — usually from two independent DOMContentLoaded listeners | Use Single-Block or Two-Block from the tabs above |
| initialize skipped: setUp failed earlier | setUp() failed and you still called initialize() | Fix the underlying setUp() failure. The original error popup is still on screen. |
Example Implementations
View complete working implementations on GitHub:
Connecting Sageion to Your Product's Authentication
Sageion does not own your user identities. Your product remains the source of truth — users sign up and log in against your own backend, and Sageion is told about them via a small onboarding call. This page shows the full flow end-to-end.
🔑 How identity flows
- A user signs up in your app. Your backend creates the user record and returns its own token.
- Your backend calls Sageion's onboarding endpoint with the user's uid and your app_name. This maps the user into Sageion.
- On the frontend, your app calls initialize({ uid }) with the same uid. Sageion now knows which of its users this is.
- When the user logs out, your app calls window.sageion_os.logout() so Sageion clears the session.
UID is the only link
The uid you pass to onboarding must match the uid you pass to initialize() exactly. Sageion has no other way to know which of your users is which. Use your own users.id, users.uid, or another stable unique key — just be consistent.
Onboarding API
The onboarding endpoint registers a user with Sageion so they can appear in the Admin Panel and use the chat box.
POST https://{region}.userauth2.tezkit.com/dev/onboardingReplace {region} with your Sageion region — either us or in. It's the same value you pass as region to setUp() on the frontend.
Headers
| Header | Value | Where to get it |
|---|---|---|
| X-API-Key | Your Sageion REST API key | Sageion Admin Panel → App Details → REST API Key |
| Content-Type | application/json | Always this value |
Body
| Field | Type | Required | Description |
|---|---|---|---|
| uid | string | Yes | Your platform's unique user identifier, as a string. Must match what you pass to initialize() on the frontend. |
| app_name | string | Yes | Your registered Sageion application name (from App Details). |
Example request
curl --location 'https://us.userauth2.tezkit.com/dev/onboarding' \
  --header 'X-API-Key: YOUR_REST_API_KEY' \
  --header 'Content-Type: application/json' \
  --data '{
    "uid": "12345",
    "app_name": "your_application_name"
}'Response
A successful onboarding returns HTTP 200 with a small confirmation payload. Once onboarded, the user appears under Users in the Sageion Admin Panel for that app.
Response contract — status codes only
The onboarding response body is not read by Sageion. What matters is the status code: 2xx means the user is onboarded. If the user was already onboarded, your handler should still return 2xx — onboarding is idempotent. On failure, return 4xx or 5xx so your own retry logic can detect it. Because the client SDK treats any 2xx as success, do not return 200 on failure.
Where to call onboarding
Onboarding must be called exactly once per user, ideally the moment your own signup succeeds. Pick your backend language below, then choose the onboarding method that matches your workflow.
Express + axios. This is the reference implementation used by Sageion's own sample app.
Backend onboarding (Node.js)
Call onboarding inside your /register handler, right after your own user row is created. It's fire-and-forget: your signup succeeds even if onboarding fails.
// routes/auth.js
const axios = require('axios');

router.post('/register', [...validators], async (req, res) => {
  const { email, password, full_name } = req.body;

  // 1. Create the user in your own DB
  const hashed = await hashPassword(password);
  const result = await pool.query(
    'INSERT INTO users (email, password_hash, full_name) VALUES ($1, $2, $3) RETURNING id, email, full_name, role',
    [email, hashed, full_name]
  );
  const user = result.rows[0];

  // 2. Onboard the user into Sageion (fire-and-forget)
  try {
    const onboardingUrl = `https://${process.env.SAGEION_REGION}.userauth2.tezkit.com/dev/onboarding`;
    await axios.post(
      onboardingUrl,
      {
        uid: user.id.toString(),
        app_name: process.env.SAGEION_APP_NAME,
      },
      {
        headers: {
          'X-API-Key': process.env.SAGEION_REST_API_KEY,
          'Content-Type': 'application/json',
        },
        timeout: 5000,
      }
    );
  } catch (onboardErr) {
    // Do NOT fail registration — the user can still log in and use your app.
    // The chat box just won't work for this user until they're onboarded.
    console.error('Sageion onboarding error:', onboardErr.message);
  }

  // 3. Return your own token — Sageion does not issue auth tokens
  const token = generateToken(user.id, user.email, user.role);
  res.status(201).json({ token, user });
});Onboarding failure is silent by design
If the onboarding call fails, registration still succeeds. Your user exists in your DB but not in Sageion — the chat box won't work for them until they're onboarded. Add an alert or a background retry so you notice.
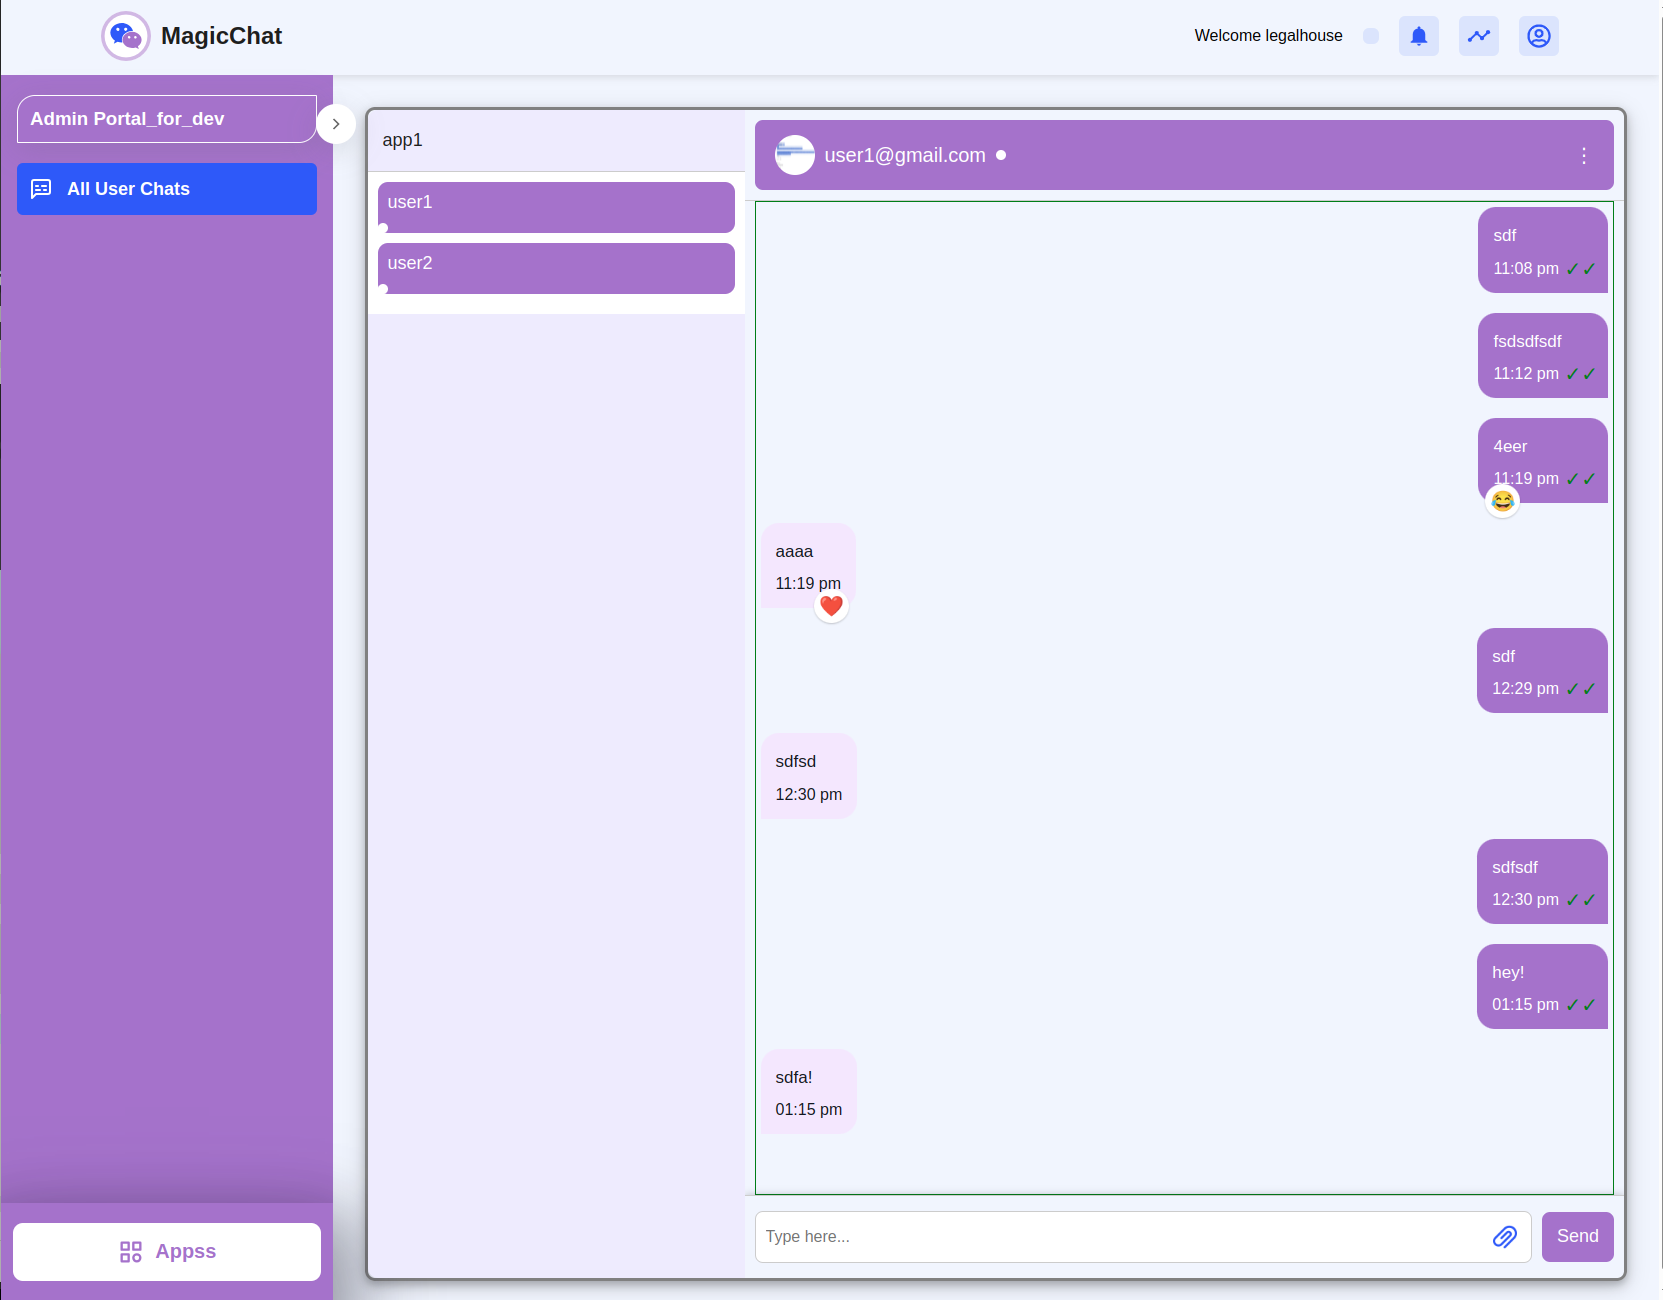
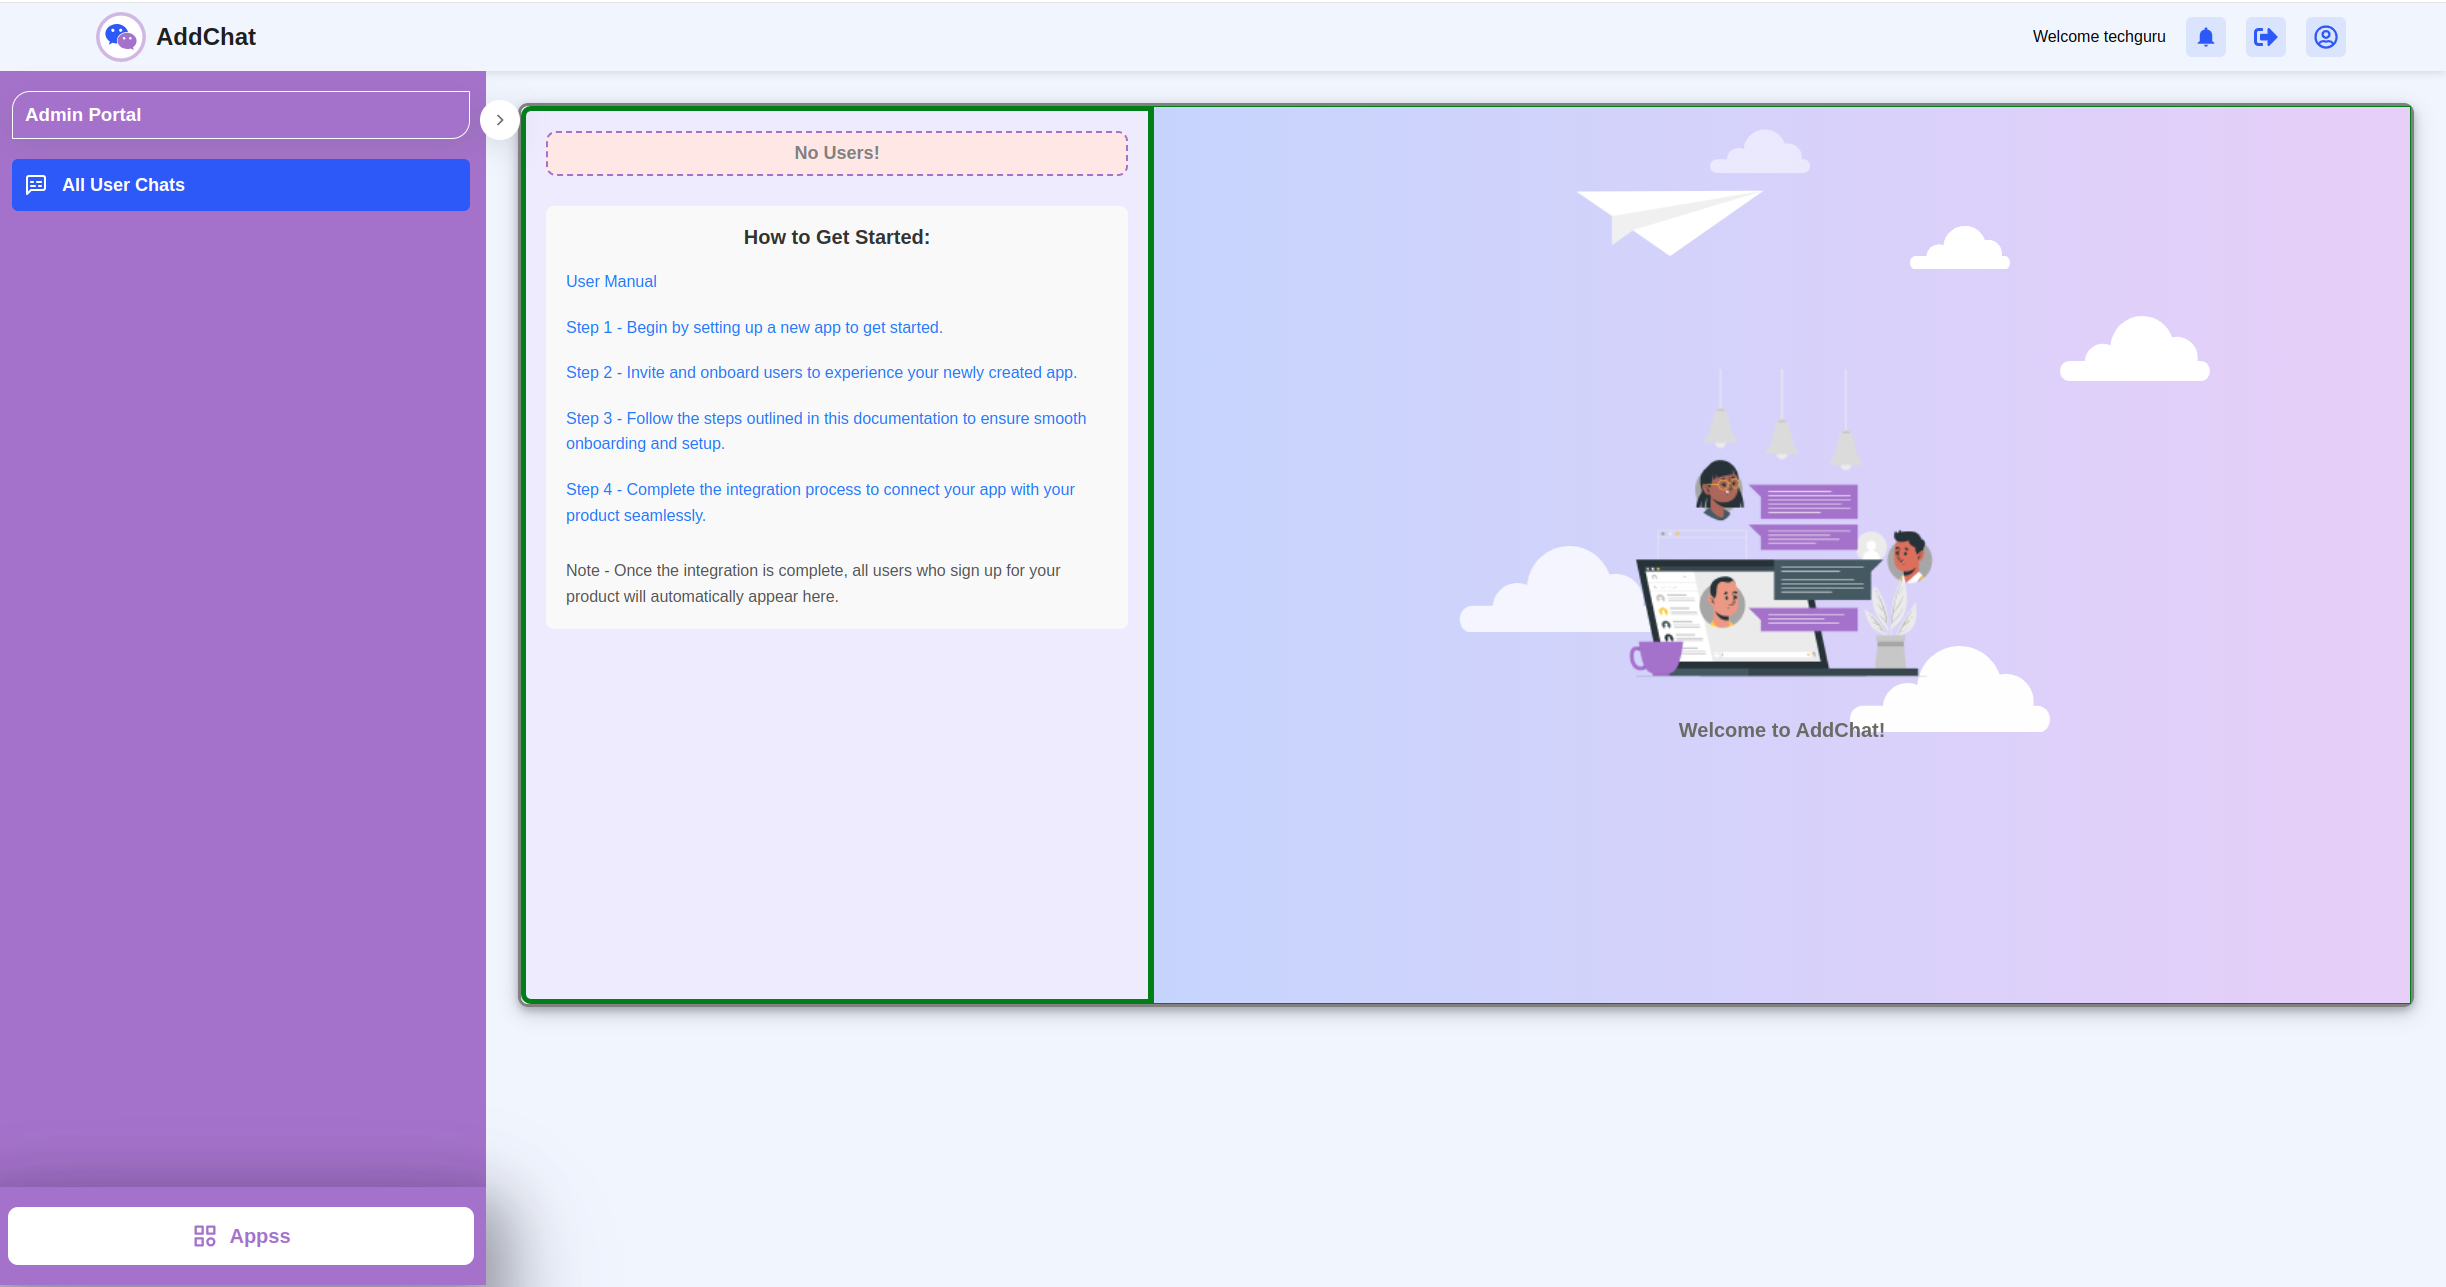
What onboarded users look like
Once a user is onboarded, they appear in the Sageion Admin Panel under your application, ready for chat. Applications without any onboarded users show an empty state.
1
Admin Panel — users present
2
Admin Panel — no users yet
Logout cleanup
Because authentication is handled by your own product, you must tell Sageion when a user logs out. Otherwise the chat session persists and the chat box may remain visible after logout.
Always call logout on the client
This is a frontend-only call. Sageion does not expose a server-side logout endpoint — the SDK clears its own storage and disconnects its sockets when you invoke it.
// In your client-side logout handler:
window.sageion_os.logout?.();

// It:
//   - clears all tezkit_* keys from localStorage
//   - disconnects the active socket and AI socket
//   - resets setupStatus back to "idle"
// After logout, call initialize() again to re-open the chat as anonymous.APIs the AI agent can call — sync vs. async
Every API you register with Sageion falls into one of two categories, depending on how quickly it can produce its final result. Pick the one that matches the nature of the endpoint — most APIs are synchronous, and you only reach for async when the final result genuinely cannot be produced within the request lifecycle.
| Synchronous (default) | Asynchronous (Async Callback enabled) | |
|---|---|---|
| When to use | The endpoint can compute and return the final result within a few seconds of the request. | The endpoint cannot produce the final result immediately — it depends on a payment gateway, an approval, a background job, or an external event. |
| How the agent gets the result | Reads it from the HTTP response body. | Waits for your backend to POST the final result to Sageion's webhook callback URL. |
| What your handler does | Does the work, returns the final result. | Acknowledges the request, kicks off the work, returns early — then POSTs the final result via webhook when it's ready. |
| What Sageion sends | Nothing extra. | An x-correlation-id header on the initial request. |
| Where the config lives | Nothing to configure — this is the default. | Enable Async Callback when registering the API in the Sageion Admin Panel. |
One endpoint, one nature
An endpoint is either synchronous or asynchronous — it does not switch between the two at runtime. The example code below uses an if (correlation_id) branch purely to illustrate both paths on one screen; a real integration picks one and sticks with it. If your API is synchronous, you never read x-correlation-id. If it's asynchronous, Sageion always sends it (because you enabled Async Callback for that API) and your handler always uses it.
Path A — Synchronous API
You write your handler exactly as you would for any normal API. Sageion calls your endpoint, waits for the response, and uses the body as the final result. No special headers to read, no webhook to post — nothing.
// Example: a bookings endpoint that confirms the reservation inline.
// This is what a synchronous API looks like — no correlation_id, no webhook.

router.post('/bookings', [...validators], async (req, res) => {
  const { room_id, check_in, check_out } = req.body;
  const user_id = req.user.userId;

  // Do the work and return the final result. That's it.
  const booking = await createBooking(user_id, room_id, check_in, check_out);
  res.status(201).json({
    success: true,
    booking_id: booking.id,
    status: booking.status,
  });
});You're done
If your API is synchronous, that's all you need to know. Everything that follows in this section is for the async case only.
Path B — Asynchronous API (Async Callback enabled)
You register the API in the Sageion Admin Panel with Async Callback enabled. From then on, Sageion attaches an x-correlation-id header to every request to that endpoint and treats your initial response as an acknowledgment, not as the final answer.
🔄 When async is the right choice
- The action depends on a payment gateway — the user pays, then the gateway confirms minutes later.
- The action depends on a human approval that happens out-of-band (a manager clicks approve).
- The action kicks off a multi-step workflow in your own system whose completion is signalled by a separate event.
- The action needs to send the user an email or SMS and wait for a response before it can produce a final result.
If none of these apply — if your backend can compute the final result by the time the request handler returns — use the synchronous path instead. Async adds complexity, and there's no reason to reach for it prematurely.
How the async flow works
1
Sageion sends the request with x-correlation-id
Because the API is configured with Async Callback enabled, Sageion attaches an x-correlation-id header to every call. This header is the only thing that distinguishes an async-configured call from a synchronous one.
2
Your handler acknowledges the request and kicks off the work
Read req.headers['x-correlation-id'], start whatever needs to happen (send a payment link, queue a job, notify another service), and respond immediately — usually with HTTP 202 and any interim data the user should see. Do not wait for the async work to complete inside the handler.
3
Later — when the work completes — your backend POSTs to Sageion's webhook
Once the async operation finishes (payment confirmed, job complete, external system replied), your backend — or the external service's own webhook handler in your code — POSTs a JSON body containing the same correlation_id and the final data to Sageion's webhook callback URL.
4
Sageion matches the correlation_id and resumes the workflow
The workflow engine pairs the callback with the original request, resumes execution, and passes the data you sent into the next step.
Request header: x-correlation-id
| Header | Type | Description |
|---|---|---|
| x-correlation-id | string | Sent by Sageion on every request to an API configured with Async Callback. Your handler reads it and echoes it back in the webhook payload so the callback can be matched to the original request. |
Webhook callback contract
POST https://{region}.autobot2.tezkit.com/dev/webhook/callbackThis is Sageion's webhook receiver. Your backend posts here when the async operation completes. The URL and environment suffix vary by region — use the one configured in your Admin Panel's webhook settings.
| Field | Type | Required | Description |
|---|---|---|---|
| correlation_id | string | Yes | The exact x-correlation-id value Sageion sent in the original request. Used to match the callback to the workflow step. |
| data | object | Yes | The final payload the workflow engine should receive as the API response. Any JSON shape is allowed — Sageion passes it through to the next step. |
Response format is a contract — match it exactly
- correlation_id must be the verbatim string from the request header. Do not reformat, prefix, or wrap it.
- data must be a top-level object, not a string. Wrapping the payload in JSON.stringify() before posting will break parsing.
- The webhook POST should return 2xx. Sageion retries on non-2xx responses, so return 200 immediately after your handler acknowledges the callback — do not delay on downstream work.
- Extra top-level fields beyond correlation_id and data are ignored.
Worked example — a booking that waits on payment
Consider a hotel booking API. When the user asks to book a room, the API does not confirm the booking immediately — instead, it emails a payment link. The booking only becomes confirmed once the payment gateway reports success, which happens minutes later. This is the textbook case for async: the final result genuinely cannot be produced within the request lifecycle.
Below are the same booking endpoint written both ways, so you can see exactly where the async pattern diverges. The synchronous version confirms the booking inline and returns. The async version acknowledges the request, sends the payment link, and produces the final result later via the payment provider's webhook handler.
The endpoint does everything up front and returns the confirmed booking. Sageion reads the result from the HTTP response body. No x-correlation-id is present, no webhook is involved.
// routes/bookings.js — SYNC booking (confirms immediately)
router.post('/', [...validators], async (req, res) => {
  const { room_id, check_in, check_out } = req.body;
  const user_id = req.user.userId;

  // Do all the work now and return the final result.
  const booking = await createBooking(user_id, room_id, check_in, check_out);

  res.status(201).json({
    success: true,
    booking_id: booking.id,
    status: 'confirmed',
  });
});Async handler — reference implementations
The concept is identical across languages: read x-correlation-id, return early, then POST the final result to Sageion's webhook callback when the async work finishes. Below are minimal reference implementations.
// routes/orders.js — async order submission
const axios = require('axios');

router.post('/orders', async (req, res) => {
  const correlation_id = req.headers['x-correlation-id'];

  // Kick off the long-running work (queue a job, call an external system).
  const order = await createPendingOrder(req.body);
  await attachCorrelationId(order.id, correlation_id);

  // Return early.
  res.status(202).json({ success: true, order_id: order.id, status: 'processing' });

  // ... elsewhere, when the work finishes:
  // await axios.post(
  //   `https://${process.env.SAGEION_REGION}.autobot2.tezkit.com/dev/webhook/callback`,
  //   {
  //     correlation_id,
  //     data: { success: true, order_id: order.id, status: 'completed' },
  //   }
  // );
});✅ Checklist for async APIs
- Enable Async Callback in the Sageion Admin Panel when you register the API. Without this, Sageion sends no x-correlation-id and your handler will not know a webhook is expected.
- Read x-correlation-id at the very top of the handler, before any branch that could return early.
- Persist the correlation_id alongside the entity the async work is about (order, booking, job). You will need it in a completely different request later.
- Respond to the initial request quickly — 2xx with any interim data. Do not wait for the async work inside the original handler.
- When the async work finishes, POST to Sageion's webhook callback with the same correlation_id, verbatim, and a data object containing the final result.
- Log the correlation_id at every step of your pipeline. It is the only way to correlate Sageion's original request with your eventual callback.
Environment variables
Your backend needs these variables. Add them to your server's environment — never expose SAGEION_REST_API_KEY or SAGEION_CLIENT_SECRET to the browser.
| Variable | Example | Used for |
|---|---|---|
| SAGEION_REGION | us | Regional prefix in the onboarding URL and webhook callback URL. |
| SAGEION_APP_NAME | ai_chatbot_system | Identifies your Sageion app in onboarding and agent-token requests. |
| SAGEION_REST_API_KEY | your_rest_api_key | X-API-Key header for onboarding. |
| SAGEION_CLIENT_SECRET | your_client_secret | Verifies client credentials on /client-user-token (only needed if you enable the optional AI agent section below). Never expose to the browser. |
| WEBHOOK_CALLBACK_URL | https://us.autobot2.tezkit.com/dev/webhook/callback | Where your backend posts async results for APIs configured with webhook enabled. |
✅ Base integration checklist
- Trigger onboarding immediately after your own user is created — inside the same signup handler, not in a background job.
- Treat onboarding failures as non-fatal to signup, but log them and add an alert so you notice missing users.
- Use the exact same uid in onboarding and in initialize({ uid }) — they must match for the chat box to work.
- Always call window.sageion_os.logout() from your own logout handler, before clearing your own session.
- Never ship SAGEION_CLIENT_SECRET or SAGEION_REST_API_KEY to the frontend. If you use the frontend onboarding method, use a different token scoped to onboarding only.
- For bulk onboarding of existing users, contact Sageion Support before calling the API in a loop.
Once all six items above are done, your Sageion integration is complete. The next section is optional and can be added at any time.
Binding the AI agent to a user for authenticated API access (Optional)
📌 Optional — add this whenever you need it
You do not need this section to get Sageion's chat box running. Your users can chat with the AI agent without it. Set it up only when you want the AI agent to access protected endpoints on your own backend — for example, to fetch or modify a specific user's bookings on their behalf.
You can do this during your initial integration from day one, or add it later when the need arises — nothing on this page conflicts with anything above.
⚠️ Response format is a contract — match it exactly
For the AI agent to successfully call your /auth/client-user-token, /auth/send-otp, and /auth/verify-otp endpoints, your handlers must return responses in the exact shape documented below. The workflow engine reads specific field names from each response — it does not adapt to renames, extra wrappers, or missing fields.
- Do not wrap responses in { data: { ... } } or { result: { ... } } — return the fields at the top level.
- Do not rename fields. token must be token, user_id must be user_id, scope must be scope, expires_in must be expires_in.
- Do not omit fields. expires_in and scope are read by the client to decide token freshness and permitted actions.
- Extra fields beyond the ones documented are allowed and will be ignored.
- Status codes matter: 200 for success, 401 for invalid client credentials, 404 for unknown user. The workflow engine branches on these codes.
What problem does this solve?
By default, the AI agent talks to your backend as a generic client. If your backend exposes user-scoped endpoints (like GET /bookings/me), the agent has no way to prove who it's acting for — so it can't reach those endpoints.
This integration closes that gap. Your backend exchanges its client credentials for a short-lived, scoped token tied to a specific user. The agent then calls your authenticated endpoints as that user.
🧩 When you need this
- Your AI workflows call your own backend APIs on behalf of a logged-in user
- You want fine-grained scopes (read, create, update, cancel) rather than blanket access
- You want short-lived tokens (1 hour) rather than long-lived user sessions
1. Agent token endpoint (/auth/client-user-token)
Your backend exposes this endpoint. It accepts the client credentials plus a user id, verifies both, and returns a short-lived JWT the agent can use.
POST /auth/client-user-token| Field | Type | Required | Description |
|---|---|---|---|
| client_id | string | Yes | Your Sageion app_name. |
| client_secret | string | Yes | Your Sageion client secret. Keep this server-side only. |
| user_id | string | Yes | The user's id from your platform. Must be numeric. |
| session_id | string | No | Optional session identifier to correlate token usage. |
Response:
| Field | Type | Description |
|---|---|---|
| token | string | Short-lived JWT the agent uses for subsequent calls. |
| expires_in | number | Seconds until expiry — currently 3600. |
| scope | string[] | Actions authorized by the token. Currently: booking:read, booking:create, booking:update, booking:cancel. |
| user_id | string | Echo of the user_id the token was issued for. |
Response contract — required fields
| Field | Type | Required | Why it matters |
|---|---|---|---|
| token | string | Yes | The JWT the agent attaches as a Bearer token. Missing or null → the agent cannot make authenticated calls. |
| expires_in | number | Yes | Seconds until expiry. If omitted, the agent cannot tell when to refresh the token. |
| scope | string[] | Yes | The list of actions this token authorizes. The agent checks this list before attempting operations. |
| user_id | string | Yes | Echo of the user_id the token was issued for. The agent uses it to verify the token is bound to the right user. |
Return this object at the top level with HTTP 200. On failure, return HTTP 401 (invalid client credentials) or HTTP 404 (user not found) with a plain JSON body — the agent treats non-2xx responses as refusals, not as retryable errors.
Reference implementation by language
Backend handler — Node.js
// routes/auth.js

const SAGEION_APP_NAME = process.env.SAGEION_APP_NAME;
const SAGEION_CLIENT_SECRET = process.env.SAGEION_CLIENT_SECRET;

router.post('/client-user-token', [
  body('client_id').notEmpty(),
  body('client_secret').notEmpty(),
  body('user_id').notEmpty().isInt(),
  body('session_id').optional().isString(),
], async (req, res) => {
  const { client_id, client_secret, user_id, session_id } = req.body;

  // 1. Verify client credentials
  if (client_id !== SAGEION_APP_NAME || client_secret !== SAGEION_CLIENT_SECRET) {
    return res.status(401).json({ error: 'Invalid client credentials' });
  }

  // 2. Verify the user exists
  const check = await pool.query('SELECT id FROM users WHERE id = $1', [user_id]);
  if (check.rows.length === 0) {
    return res.status(404).json({ error: 'User not found' });
  }

  // 3. Issue a scoped, short-lived token
  const scopes = [
    'booking:read', 'booking:create', 'booking:update', 'booking:cancel',
  ];
  const token = generateToken(user_id, 'client@system', 'client', {
    scope: scopes,
    client_id,
    session_id,
  });

  res.json({ token, expires_in: 3600, scope: scopes, user_id });
});Calling it from your agent workflow (Node.js)
const axios = require('axios');

async function getAgentToken(userId) {
  const { data } = await axios.post(
    `${process.env.API_BASE_URL}/auth/client-user-token`,
    {
      client_id: process.env.SAGEION_APP_NAME,
      client_secret: process.env.SAGEION_CLIENT_SECRET,
      user_id: String(userId),
    }
  );
  return data.token; // use as Bearer token for agent-initiated calls
}2. OTP endpoints (/auth/send-otp, /auth/verify-otp)
Two endpoints back an OTP flow, useful when an action triggered from chat needs a second factor of confirmation — for example, cancelling a booking.
OTP is not your login
These endpoints verify one-off actions. They are separate from your main login flow and do not issue a session token.
2a. Send OTP — POST /auth/send-otp
| Field | Type | Required | Description |
|---|---|---|---|
| string | Yes | Email address the OTP is associated with. |
Generates a 6-digit OTP, stores it against the email, and expires it after 5 minutes. The reference implementation logs the OTP — plug in your own email provider for delivery.
Response contract — required fields
| Field | Type | Required | Why it matters |
|---|---|---|---|
| success | boolean | Yes | The workflow engine checks this to decide whether to proceed to the verification step. |
Return this object at the top level with HTTP 200. If sending fails (bad email, provider outage), return HTTP 400 or 500 — do not return 200 with success: false, because the workflow engine treats 2xx as authoritative.
Reference implementation by language — /send-otp
// routes/auth.js — send OTP
router.post('/send-otp', [
  body('email').isEmail().normalizeEmail(),
], async (req, res) => {
  const errors = validationResult(req);
  if (!errors.isEmpty()) return res.status(400).json({ errors: errors.array() });

  const { email } = req.body;
  const otp = Math.floor(100000 + Math.random() * 900000).toString();
  const expiresAt = new Date(Date.now() + 5 * 60 * 1000); // 5 min

  try {
    await pool.query(
      `INSERT INTO otps (email, otp, expires_at) VALUES ($1, $2, $3)
       ON CONFLICT (email) DO UPDATE SET otp = $2, expires_at = $3`,
      [email, otp, expiresAt]
    );
    // TODO: send via your email provider
    console.log(`[OTP] Sent OTP ${otp} to ${email}`);
    res.json({ success: true, message: 'OTP sent' });
  } catch (err) {
    console.error(err);
    res.status(500).json({ error: 'Server error' });
  }
});2b. Verify OTP — POST /auth/verify-otp
| Field | Type | Required | Description |
|---|---|---|---|
| string | Yes | The email the OTP was sent to. | |
| otp | string | Yes | The 6-digit code the user entered. |
On success, returns { success: true, user_id } so the workflow can continue with the verified identity. The OTP record is deleted after verification.
Response contract — required fields
| Field | Type | Required | Why it matters |
|---|---|---|---|
| success | boolean | Yes | The workflow engine checks this to allow the OTP-gated action to proceed. |
| user_id | string | Yes | The verified user's id. The workflow continues with this identity — omitting it breaks any downstream user-scoped call. |
Return this object at the top level with HTTP 200. On verification failure, return HTTP 400 with a plain JSON body.
user_id must be a string
JSON numbers lose leading zeros and can be represented inconsistently across languages (JavaScript numbers, Go int64, Python int). To keep the identity check reliable, always return user_id as a JSON string — for example "user_id": "12345" — even if your database column is an integer.
Reference implementation by language — /verify-otp
// routes/auth.js — verify OTP
router.post('/verify-otp', [
  body('email').isEmail().normalizeEmail(),
  body('otp').isLength({ min: 6, max: 6 }).matches(/^\d+$/),
], async (req, res) => {
  const errors = validationResult(req);
  if (!errors.isEmpty()) return res.status(400).json({ errors: errors.array() });

  const { email, otp } = req.body;
  try {
    const result = await pool.query(
      'SELECT otp, expires_at FROM otps WHERE email = $1',
      [email]
    );
    if (result.rows.length === 0) {
      return res.status(400).json({ error: 'No OTP request found' });
    }
    const record = result.rows[0];
    if (record.otp !== otp) {
      return res.status(400).json({ error: 'Invalid OTP' });
    }
    if (new Date() > new Date(record.expires_at)) {
      return res.status(400).json({ error: 'OTP expired' });
    }

    const userResult = await pool.query(
      'SELECT id FROM users WHERE email = $1', [email]
    );
    if (userResult.rows.length === 0) {
      return res.status(404).json({ error: 'User not found' });
    }
    const userId = userResult.rows[0].id;

    await pool.query('DELETE FROM otps WHERE email = $1', [email]);

    res.json({
      success: true,
      message: 'OTP verified successfully',
      user_id: userId.toString(),
    });
  } catch (err) {
    console.error(err);
    res.status(500).json({ error: 'Server error' });
  }
});✅ You're done with the base integration
Everything above the "Binding the AI agent to a user" section is what you need to get Sageion working. Everything from that section onward is additive — nothing there is required for the chat box to work.
Platform
The Sageion Admin Platform provides comprehensive tools for managing your chat applications, users, and system settings. Below is an overview of the key sections available in the Admin UI.
Global Level Settings
These settings apply across all applications within your tenant, providing centralized control over system-wide configurations.
🔐 Admin Access Required
Only users with ADMIN or MANAGER role have access to these settings. If you don't see these options, contact your system administrator.
Global Tenant Settings
The Global Tenant Settings page allows administrators to configure tenant-wide features that affect all applications under the tenant.
Enables email notifications at various useful events across all applications. This toggle controls whether email alerts are sent for key system events.
📧 Available Notification Triggers
| Trigger | Description | Availability |
|---|---|---|
| FIRST MSG ON ANY APP | Triggers when the first message arrives on any app since admin went offline | All Plans |
| FIRST MSG ON EVERY APP | Triggers when the first message arrives on every app since admin went offline | 📌 ADVANCE Plan Only |
Configuration Options
Email notifications can be customized per event type. Configure which events trigger emails and the recipient list in the settings panel.
Plan Restriction
"FIRST MSG ON EVERY APP" is only available on the ADVANCE plan. Upgrade your plan to access this feature.
Invite Support User
Invite team members as support users with granular permission controls. This feature allows you to add users with specific roles and permissions to manage your applications.
📌 Multi-Admin Required
The Invite Support User feature requires Multi-Admin to be enabled in Global Tenant Settings first. This ensures proper permission hierarchy and security.
👤 User Roles
| Role | Access Level | Primary Responsibilities |
|---|---|---|
| MANAGER | Full Access | Manage applications, settings, and users |
| DEVELOPER | Technical Access | API configuration, workflows, and technical settings |
| CUSTOMER_CARE_EXECUTIVE | Limited Access | All Chats and user management |
Role Assignment
Users can be assigned multiple roles. The combination of roles determines the user's overall permissions.
Whitelabel Domains
Configure custom domains for your applications to maintain brand consistency. This allows you to serve the Sageion chat interface from your own domain.
Available Features
- Add custom domain names for your applications
- SSL certificate management
- DNS configuration guidance
DNS Configuration Guide
To set up a custom domain:
- Add your domain in the Whitelabel Domains section
- Configure DNS records as instructed
- Wait for DNS propagation (24-48 hours)
- Verify the domain and enable SSL
✅ Setup Complete
Once configured, your chat interface will be served from your custom domain, providing a seamless brand experience for your users.
FAQ Chat & Lead Generation
The FAQ Chat & Lead Generation section provides powerful tools for building interactive FAQ trees, managing leads, and capturing visitor information through forms.
LeadGen & FAQ
This feature combines two powerful capabilities: Interactive FAQ/Q&A Trees and Lead Generation.
Two Modes
- FAQ/Q&A Tree Mode: Build hierarchical question-answer structures
- Lead Generation Mode: Capture leads at any node in the tree
🌳 FAQ Tree Builder
The Dynamic Tree Builder allows you to create structured FAQ content:
- Create hierarchical question-answer trees
- Add sub-questions and answers
- Attach lead generation forms at any node
- Enable/disable the FAQ bot content
⚠️ At Least One Chatbot Required
You must have at least one chatbot enabled at all times. The system validates that either AI Chat, Live Agent, or FAQ Bot is active. You cannot disable all chatbots simultaneously.
🎯 Lead Generation Management
Capture and manage leads from your FAQ forms and other sources:
- View all captured leads with timestamps and metadata
- Export leads to XLSX or CSV format
- Leads are automatically stored in the Admin Panel
- Connect to external servers via AI Agent workflows
| Lead Field | Description |
|---|---|
| Lead ID | Unique identifier for each lead |
| Timestamp | When the lead was captured |
| Lead Data | Form fields and user responses |
| Metadata | Additional context (source, page, etc.) |
📝 Bot Forms & Post-Processing
Configure how forms behave and what happens after submission:
| Template Type | Description | Use Case |
|---|---|---|
| THANK_YOU | Shows appreciation message | Simple thank you response |
| GET_BACK_TO_YOU_SHORTLY | Informs about follow-up | Lead qualification |
Lead Storage Options
- Built-in Storage: Leads stored in Sageion Admin Panel under Lead Generation section
- External Integration: Send to external servers via orchestrated AI Agent workflows
🔧 Form Field Configuration
Each form can have multiple fields with the following properties:
| Field Property | Description | Example |
|---|---|---|
| Label | Display name | Email Address |
| Type | Field type | text, email, phone, etc. |
| Required | Whether field is mandatory | true/false |
| Placeholder | Hint text | Enter your email |
✅ Best Practice
Keep lead capture forms short and focused on essential information to maximize conversion rates.
🔄 Update Process
When updating LeadGen & FAQ settings:
- Make your changes to the FAQ tree or lead settings
- Click the 'Update' button at the bottom
- Review the confirmation modal (all clients will be rebooted)
- Confirm to apply changes
⚠️ Client Reboot Warning
Updating LeadGen & FAQ settings will reboot all active clients to sync the new configuration.
✅ FAQ Chat & Lead Generation Overview Complete
The LeadGen & FAQ feature provides a complete solution for building interactive FAQ trees and capturing leads from your website visitors.
Live Agent
The Live Agent feature enables real-time human-to-human chat support, allowing you to interact directly with your website visitors and provide personalized assistance.
Live Agent Features
Configure all aspects of your Live Agent experience including enabling/disabling, user capacity, chat appearance, messaging, and updates.
Site Users represent the total number of unique visitors who can register and interact with your Live Agent. Each registered user consumes one slot from your capacity.
📊 Understanding Your Capacity
| Metric | Description |
|---|---|
| Plan Limit | Base number of user slots included in your plan |
| Top-ups Added | Additional slots purchased through top-ups |
| Total Capacity | Plan Limit + Top-ups Added |
| Available Slots | Remaining slots available for new users |
- Progress bar shows remaining capacity percentage
- Low capacity warning appears when below 20%
- Critical warning appears when 0 slots remain
🔄 How Site Users Work
Each unique visitor who registers or starts a chat session consumes one user slot. Slots are not released until the user is explicitly removed or the session expires.
👥 Top-Up Options
When you're running low on user slots, you can purchase additional capacity:
| Slots Added | Price | Cost Per Slot |
|---|---|---|
| +125 Slots | ₹1,500 | ~₹12 per slot |
| +250 Slots | ₹3,000 | ~₹12 per slot |
| +375 Slots | ₹4,500 | ~₹12 per slot |
💡 Pro Tip
Top-ups are added permanently to your total capacity. Consider purchasing larger packages for better value if you expect high user growth.
✅ Live Agent Overview Complete
The Live Agent feature provides real-time human chat support for your website visitors. Enable it to offer personalized assistance and improve customer satisfaction.
Monitor your Site Users capacity regularly and top up when needed to ensure you never run out of slots for new users.
AI Chat
The AI Chat feature provides intelligent conversational AI capabilities for your website, enabling automated customer support, lead qualification, and information retrieval using advanced language models.
AI Chat Features
Configure all aspects of your AI Chat experience including enabling/disabling, message credits, ingestion storage, data sources, and training.
The AI Agent bot provides automated conversational AI capabilities for your website visitors.
How to Enable
- Navigate to AI Chat settings from the sidebar
- Toggle the 'Enable AI Agent Bot' switch to ON
- All AI agent settings will appear below
- Configure your data sources and training
- Click 'Update AI Chat' to save changes
🤖 What the AI Agent Can Do
- Answer customer questions 24/7
- Qualify leads through conversation
- Retrieve information from your knowledge base
- Escalate complex issues to human agents
⚠️ At Least One Chatbot Required
You must have at least one chatbot enabled at all times. The system validates that either AI Chat, QnA (LeadGen) Bot, or Live Agent is active. You cannot disable all chatbots simultaneously.
✅ AI Chat Overview Complete
The AI Chat feature provides intelligent conversational AI for your website. Enable it to automate customer support, qualify leads, and provide 24/7 assistance.
Monitor your AI message credits and ingestion storage regularly. Top up when needed and retrain your AI Agent with fresh data to keep responses accurate and relevant.
All Chat
The All Chat feature provides a comprehensive real-time messaging interface for agents to communicate with site visitors, manage conversations, and provide support across all applications.
All Chat Features
The All Chat interface provides a complete messaging solution for support agents, including user management, real-time messaging, file sharing, and conversation history.
The All Chat interface is divided into two main sections: the left sidebar showing all users and the right panel displaying the active conversation.
📱 Interface Layout
| Section | Description | Key Features |
|---|---|---|
| Left Sidebar | Displays all users across all applications | User list, online status, unread counts, app grouping |
| Right Panel | Shows the active conversation | Message history, typing indicator, message input, file upload |
- Users are grouped by application for easy navigation
- Each user shows their name, online status, and unread message count
- Click on a user to open the conversation
- The chat header displays the user's name and online status

💡 Quick Navigation
Use the 'Back to Users' button in the chat header to return to the user list. The 'Refresh' button at the top reloads the entire user list.
✅ All Chat Overview Complete
The All Chat feature provides a complete real-time messaging solution for support agents. It includes user management, file sharing, message reactions.
Use the All Chat interface to manage all your support conversations in one place, across all applications and regions.
Integrations & APIs & Workflows
The Integrations & APIs & Workflows section provides comprehensive tools for configuring API connections, building multi-step workflows, and managing response templates for your chatbot applications.
API Config
The API Config section allows you to define and manage API endpoints that your chatbot can call. Each API configuration includes authentication, request structure, and response handling.
Configure authentication for your APIs to securely connect to backend services.
Primary Authentication (Login Server)
- Configure the login server that provides access tokens
- Must NOT contain an Authorization header (system adds it automatically)
- Payload must include: client_secret, user_id, client_id
- Only one Primary Authentication setup per application
Step 1: Send Verification Code (OTP)
- Send a one-time password (OTP) to the user's email or phone
- Must NOT contain an Authorization header
- Used for multi-factor authentication flows
Step 2: Verify Code & Get User ID
- Verify the OTP and return the authenticated user_id
- Must NOT contain an Authorization header
- The user_id returned is used for all subsequent API calls
💡 Authentication Flow
The authentication flow typically follows: Login Server → (Token) → API Calls. For multi-factor auth, add Step 1 (Send Code) and Step 2 (Verify Code) before the main API calls.
ChainApis
ChainApis enables you to create multi-step API workflows where the response from one API determines the next API to call. This is useful for complex business logic that requires multiple steps.
A Chain is a sequence of API calls where each step can branch based on the response status of the previous step.
Chain Structure
- Root API: The first API call in the chain
- Branches: Follow-up APIs triggered by specific response statuses
- Each branch can have its own field mappings
- Chains can be enabled/disabled
Root API: /api/check_availability (Status: 200)
  → Branch (Success): /api/book_room
→ Branch (404): /api/notify_unavailable💡 When to Use Chains
Use Chains when you need to handle complex, multi-step workflows. For example: Check Availability → (Success) Book Room → (Failure) Suggest Alternatives.
Response Settings
Response Settings allows you to manage response templates across all API configurations in one centralized location.
Centrally manage all response templates for your API configurations.
Template Features
- View and edit templates for each API config
- Create templates for multiple status codes
- Preview rendered messages
- Use Jinja syntax with field autocomplete
📌 Centralized Management
Response Settings provides a single view of all templates across your API configurations. This makes it easy to maintain consistent messaging across your chatbot.
✅ Integrations & APIs & Workflows Overview Complete
The Integrations & APIs & Workflows section provides a complete toolkit for connecting your chatbot to backend services, building complex workflows, and managing user-facing responses.
Start by configuring your APIs, then build chains for complex workflows, and finally design user-friendly response templates to create a seamless user experience.
Visual Response Designer
The Visual Response Designer is a powerful no-code tool that lets you design exactly how your AI responses appear to users. Build stunning, interactive screens without writing a single line of code.
What is the Visual Response Designer?
The Visual Response Designer is a drag-and-drop interface that transforms raw API responses into beautiful, user-friendly messages. It's designed for product managers, support teams, and developers who want full control over their chat experience without writing code.
💡 Why Use the Visual Response Designer?
- ✅ No coding required — design visually, just like building a slide
- ✅ See exactly what your users will see, in real-time
- ✅ Transform data into tables, cards, lists, and styled text with one click
- ✅ Perfect for customer support teams, product managers, and non-technical users
Key Concepts
Understanding these core concepts will help you get started quickly:
📄 Screen
A Screen is what your users see in the chat. Each screen can display different information. You can create:
- Single Screen: All data appears on one screen (perfect for simple responses)
- Multiple Screens: Each data item appears on its own screen (great for lists, search results, or multi-item responses)
📋 Template
A Template is the design of your response. It defines what information appears and how it's organized. Think of it like a slide design in PowerPoint — you design once, and it works for all your data.
🔄 Transformations
Transformations are visual enhancements you can apply to your design with one click:
- 📊 Table View — Show data in a clean, organized table
- 🃏 Card View — Display each item as a beautiful card
- 📋 List View — Show items in a simple list format
- 🎨 Style Transformations — Highlight, bold, italicize, or underline text
Getting Started
Follow these steps to create your first visual response:
1
Step 1: Paste Your Sample Response
Copy a sample JSON response from your API and paste it into the 'Sample Response' area. This gives the designer an example of your data structure.
💡 Tip
Use a real response from your API to see exactly how your data will appear. The designer automatically generates a starting template from your sample.
2
Step 2: Click 'Render Preview'
This generates a visual preview of your response. You'll see how your data looks and can start designing.
3
Step 3: Open the Visual Editor
Click 'Open Editor' to access the visual design interface. Here you can:
- Drag rows to reorder content
- Edit text directly inline
- Add custom messages
- Insert dynamic data fields
4
Step 4: Apply Transformations
Use the 'Start Wizard' button to transform your design:
- Structure — Convert to Table, Cards, or List view
- Media — Turn image URLs into actual pictures
- Styles — Apply colors, bold, italic, and alignment
5
Step 5: Save Your Design
Click 'Use Template' or 'Save Configuration' to save your visual design. It's now ready for your users!
The Visual Editor
The Visual Editor is where you design your responses. It's designed to be intuitive and powerful, like a slide editor:
🖱️ Drag & Drop Reordering
Simply drag any row up or down to change the order of content. Your changes are reflected instantly in the preview.
✏️ Inline Editing
Click the ✎ icon on any row to edit its content directly. You can:
- Change text labels
- Add custom messages
- Insert dynamic data using the @ menu
➕ Add Buttons & Button Groups
Add interactive elements to your responses:
- Single Buttons — Perfect for simple actions like 'Book Now' or 'Learn More'
- Button Groups — Multiple buttons in a row for related actions
💡 Pro Tip
Use Button Groups to offer users choices. Each button can trigger different actions, like 'View Details', 'Book Now', or 'Contact Support'.
The Transformation Wizard
The Transformation Wizard is your creative toolkit for enhancing responses. It walks you through three steps:
Change how your data is organized and displayed:
| Transformation | What It Does | Best For |
|---|---|---|
| 📊 Table View | Organizes data into a clean table with headers and rows | Comparing multiple items, structured data |
| 🃏 Card View | Shows each item as a separate card with a title and details | Profiles, product listings, individual records |
| 📋 List View | Simple list format with each item on a new line | Quick overviews, short lists |
| 📝 JSON View | Shows the raw data structure | Debugging and technical reviews |
💡 Card View Options
Card View can be displayed vertically (scrolling down) or horizontally (scrolling sideways). Choose the direction that best fits your content.
Single Screen vs Multiple Screens
The Visual Response Designer automatically detects your data structure and suggests the best layout:
| Layout Type | When It's Used | What Users See | Example |
|---|---|---|---|
| Single Screen | Your data has a single item or metadata with arrays | All information on one screen | A hotel booking confirmation with guest details |
| Multiple Screens | Your data has a list of items at the root or in an array | Each item appears on its own screen | A list of available rooms, each with its own screen |
💡 How It Works
The designer analyzes your data structure automatically. If you have a list of items, you'll get multiple screens. If you have a single object, you'll get a single screen. You can always adjust the design manually.
Live Preview
The Visual Response Designer shows you exactly what your users will see, updated in real-time as you design:
- 👁️ See your changes instantly — no refresh needed
- 📱 Preview in Desktop or Mobile view
- 🔄 See how your design looks with different data
- ✅ Ensure everything looks perfect before saving
💡 Pro Tip
Use the Desktop/Mobile toggle to test how your design looks on different devices. This ensures a great experience for all users.
Saving & Deployment
Once your design is ready, saving it is simple:
1
Review Your Design
Check the preview to ensure everything looks perfect.
2
Click 'Use Template'
This saves your design to the configuration. If you're in the standalone tool, click 'Save Configuration'.
3
Deploy to Users
Your visual design is now live! Users will see the beautiful, professional responses you've created.
⚠️ Important
When you save a design, all active clients (users) will be updated automatically to see the new response format.
Best Practices
Follow these tips to create the best user experience:
- 💡 Start simple — begin with a basic design and add complexity gradually
- 📱 Test on mobile — always preview your design in mobile view
- 🎯 Be consistent — use similar styles across all responses for brand coherence
- 📊 Use Card View for multi-item responses to improve readability
- 🎨 Apply styles sparingly — highlight only what's truly important
- 🔘 Use buttons to guide users to the next action
✅ Visual Response Designer Overview Complete
The Visual Response Designer is a no-code tool that empowers you to create beautiful, professional responses without writing code. Whether you're a product manager, support lead, or developer, you can design exactly what users see in the chat.
Start with your sample data, design visually, and deploy to users instantly. No coding required.
Congratulations! Your integration should now be successful!
Your users can now sign up and seamlessly chat with the Admin Team, enabling two-way communication.
Please contact our Support Team if you encounter any issues. Thank you!